Let’s dive into the My Instances section. What can you do right after login to your account. What options does the control panel provide you with.
Here are all the possible options, basically the TL;DR section:
– Access the My Hosting section
– Add New WordPress Instance
— Create New WordPress Instance
— Import Existing WordPress Instance
– Notifications – how to review and clear them
– View and modify your Account Details and Active Devices
– Manage your WordPress instance
– Access the WordPress admin dashboard of any of the hosted instances
Add New WordPress Instance
If you access the control panel right after purchasing, you will be prompted to create your first instance:

Simply click on the “Create First Instance” and you will be introduced with two options:
Create a New WordPress Instance or Import Existing WordPress Instance:

If you decide to start from the scratch, choose the Create New WordPress Instance, next step is to set your domain name:

Don’t forget to replace your_domain_name.com with your actual domain name. Press on the Create Site button and you will see this screen:

Now is to the time to relax give it a few minutes, usually 2-3 minutes and your brand new WordPress instance will be installed on your domain name!
After the installation is complete, go back to the control panel. Then navigate to Manage Site (hover over the thumbnail or click on the thumbnail), you will be redirected to a new page. Here you will see the DNS propagation is in progress message. Click on that button and you will see your server IP and Cloudflare NS records. We strongly recommend using the full DNS setup, in this way your website will benefit from the CDN completely.
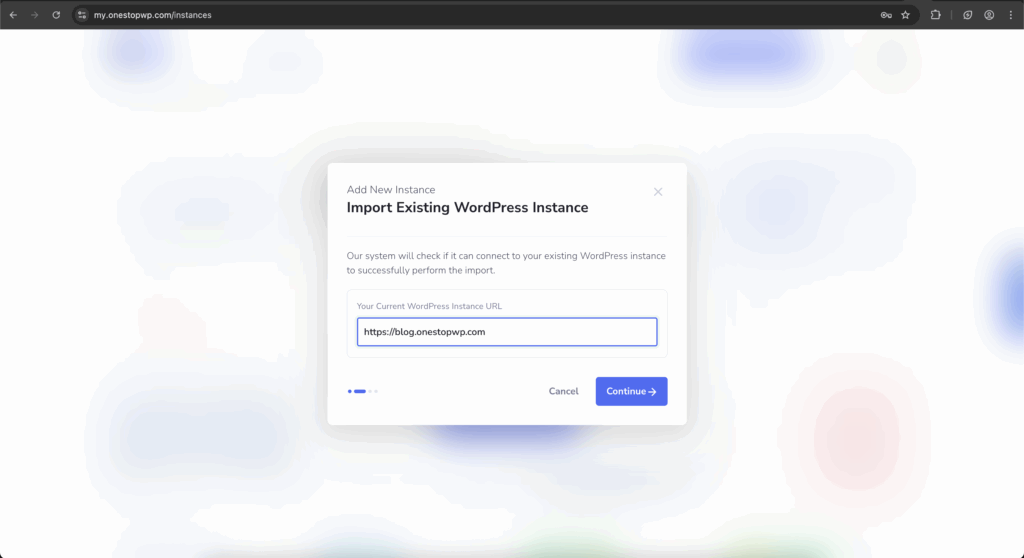
Import Existing WordPress Instance
If you already have a website and you would like to transfer it, rather starting from the scratch once you login you should press the “Create First Instance” button:
Then proceed with the Import Existing WordPress Instance option:

If you have more than one purchased plan, you will need to choose on which plan the new migration to happen. For this tutorial, we will select the Personal plan and proceed further:

The following step requires you to enter the domain name under which the WordPress instance you are transferring is operating. Once the domain is in the field our server will if the website can be reached. If there are any issues feel free to contact our support team for further assistance.
Right after this you will be prompted for the FTP details to your WordPress website at the old hosting provider. You will need to prepare the following information:
– Hostname/IP Address
– Protocol (FTP, FTPS, SFTP)
– Port
– FTP User
– FTP Password
– Installed Path

In our case our FTP username have access directly to the WordPress instance root folder, so we don’t specify anything in the Installed Path field.
Press the Continue button and your migration will start away! Now is the moment for you to relax and wait for the automated migration process to complete! If the process fails or you experience any difficulties, please contact our support team right away, we would be more than happy to assist you!
Just as with creating brand new instance, right after the migration is complete, you will need to go back to the control panel and navigate to Manage Site (hover over the thumbnail or click on the thumbnail). You will be redirected to a new page. Here you will see a message stating that the DNS propagation is in progress. Click on that button and so you can see your server IP and the Cloudflare name server records. We strongly recommend to use the full DNS setup, using the Cloudflare NS (NameServers) records to benefit from the CDN completely.
That is all about creating new WordPress website and the importing of an existing WordPress site! It is indeed this easy 🙂 Ready to proceed with the next tutorial? Let’s see how to Review Notifications related to the WordPress instances and access and modify your Account Details.